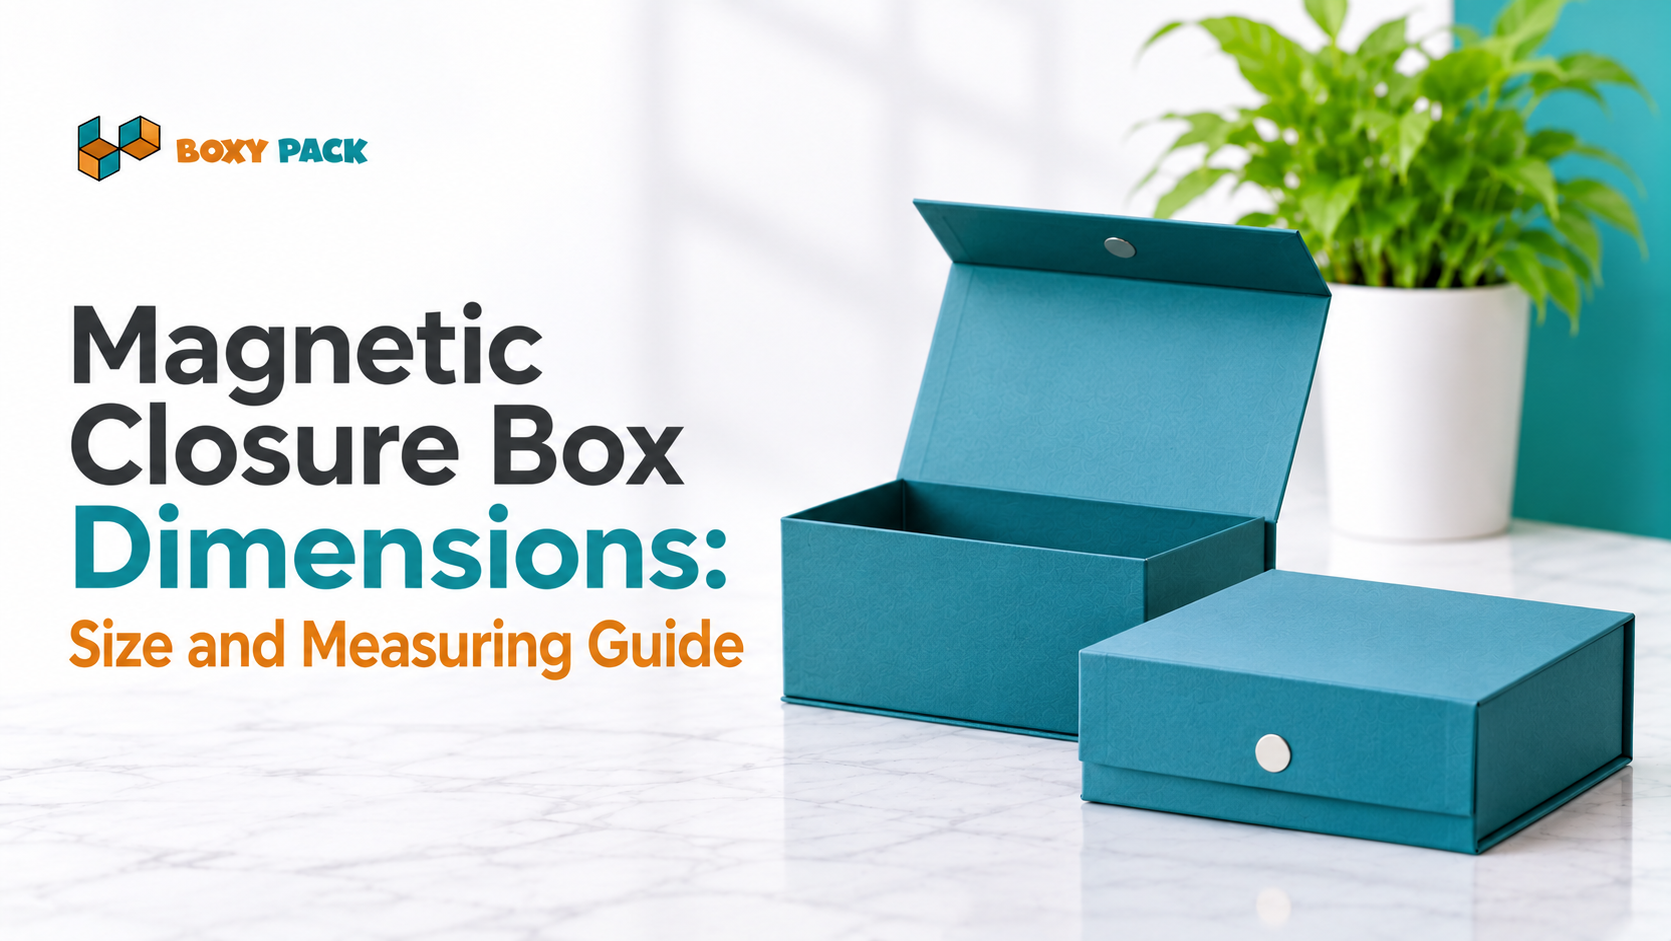
A magnetic gift box can look beautiful on a screen and still fail in the hands of a customer. The insert is too tight, the product rattles, the lid sits unevenly, or the magnets barely touch. Most of these problems trace back to incorrect magnetic closure box dimensions, and many go unnoticed until the first samples arrive. A box that feels poorly proportioned often has a sizing problem, not a design problem.
Accurate sizing involves more than measuring the product. You also need to account for interior space, greyboard thickness, lid depth, magnetic flap placement, inserts, and the finished exterior size. This guide covers the practical approach: how to collect product measurements, choose a starting size, measure correctly, and check a sample before production.
Start With the Product Before Choosing Box Dimensions
The product should drive the box specification. Choosing an attractive box size first and fitting the product into it usually leads to wasted space or a forced fit. This applies most to brands planning custom packaging, who need to know what information to gather before contacting a manufacturer. Treat it as the first step of any magnetic rigid box size guide.

Shape, weight, orientation, quantity, fragility, and presentation goals all affect the final dimensions. Some products need extra room. Glass bottles require clearance around caps and shoulders, cosmetic sets need space for dividers, and electronics need room for cables and protective layers. Jewelry usually needs very little depth, while candles and multi-item gift collections need more footprint and height. Fragrance bottles are a good example, and sellers who package perfume often start from the product's widest point and then look at options such as custom perfume boxes before settling on interior dimensions.
Measure the widest and tallest points of the product, including caps, handles, protruding parts, and any protective sleeve that will stay on during shipping. Before you request a quote, record these details:
Product length, width, and height at the widest and tallest points
Product weight and the number of items per box
Orientation (standing, lying flat, or layered)
Any cap, sleeve, or accessory that ships with the product
Fragility level and the protection you want
The unboxing effect you want, such as immediate reveal or layered reveal
Common Magnetic Gift Box Sizes for Different Products
Once the basic product measurements are clear, you can compare typical box proportions. Magnetic rigid boxes are commonly made to order, so the examples below are planning references rather than fixed industry standards. The aim is to give you realistic starting points for standard magnetic gift box dimensions across common product categories.
Small Boxes for Jewelry and Compact Gifts
Small boxes suit rings, earrings, small accessories, and individual beauty products. Shallow proportions work well for flat or lightweight items, while taller contents need extra depth. For presentation-focused pieces, many brands look at luxury jewelry packaging because small magnetic boxes show off the contents well.
A fitted insert changes the usable interior, since foam or paperboard takes up space on the base and sides. Measure the product and insert together before you finalize the inside dimensions.
Medium Boxes for Cosmetics and Fragrance Sets
Medium boxes cover skincare collections, perfume bottles, makeup sets, candles, and small electronics. Bottle height, cap clearance, and how several products are arranged all affect length, width, and depth. A set of three bottles standing in a row needs a very different footprint from the same bottles lying flat. Dividers or a shaped insert keep products separated so they do not rub against each other.
Large Boxes for Apparel and Gift Collections
Larger footprints hold folded clothing, corporate gifts, promotional kits, and multi-product collections. A wider lid panel needs structural support to avoid flexing, and big boxes may need thicker greyboard or internal reinforcement. Without it, the lid can sag and the closure can feel loose.
Why These Sizes Are Starting Points, Not Rules
Suppliers use different sizing conventions and construction tolerances. Two boxes with the same listed exterior dimensions can have different usable interiors, depending on board thickness and wrap. Always confirm whether the manufacturer's quoted measurements refer to the inside or the outside of the finished box.
Build a Practical Size Chart Around Product Categories
A quick reference chart helps when you compare magnetic closure box design sizes before requesting a custom quote. The chart below shows suggested interior dimensions. It does not imply that every manufacturer offers identical stock sizes, and it works best as a magnetic closure box size chart for planning.
Table: Illustrative Magnetic Gift Box Size Guide
Product category | Example interior length | Example interior width | Example interior height |
Jewelry gift | 4 in | 4 in | 2 in |
Cosmetic item | 6 in | 4 in | 3 in |
Fragrance set | 8 in | 6 in | 3 in |
Small electronics set | 9 in | 7 in | 3 in |
Multi-item gift set | 12 in | 9 in | 4 in |
These are illustrative planning examples, not certified or universal standard sizes. Actual dimensions depend on product measurements, insert construction, board thickness, and supplier tolerances.
To use the chart, find the row closest to your product and then adjust. If your fragrance bottle is 7.5 inches tall, the 3-inch height is clearly wrong for a standing bottle. The chart shows the proportions that usually suit each category, and your product measurements, protective clearance, and insert design decide the real numbers. Luxury magnetic box dimensions in particular tend to include more margin around the product than standard retail boxes, which is a design choice rather than a requirement.
Measure Length, Width, and Height Without Guesswork
A useful size specification starts with consistent measurements. Use the standard length, width, and height convention, measure the product carefully, and translate those numbers into a box specification. This is the core of how to measure magnetic closure boxes and the products that go in them.

Identify the Correct Length, Width, and Height
Place the product in the position it will occupy inside the box. Length is the longest horizontal measurement, width is the measurement across the shorter horizontal side, and height is the vertical measurement in the intended packaging position. For unusually shaped products, orientation may change, so record the orientation you chose.
For example, a rectangular cosmetic set might measure 7.5 inches long, 5.5 inches wide, and 2.5 inches tall when lying flat. Written in order, that is 7.5 × 5.5 × 2.5. This order matches the usual magnetic box length width height convention that manufacturers expect.
Measure Irregular Products at Their Widest Points
Curved bottles, handled products, accessories, and items with protruding parts need maximum measurements, not just the main body. Record the widest width, the tallest height, and the greatest depth. Include removable caps, attached accessories, and any product packaging that will remain inside the box. A bottle that is 2 inches wide at the body but 2.6 inches at a decorative shoulder needs the larger figure.
Add Clearance for Protection and Easy Placement
The interior should be slightly larger than the product so it can be placed and removed without friction. Bare products need a small gap on each side. Products held by foam, paperboard, or molded inserts need room for the insert walls as well. A small amount of clearance prevents scuffing and still keeps movement low. Remember that the insert's outer footprint and its product cavity both affect the final space required.
Record Measurements in One Consistent Unit
Use inches or millimeters, but do not mix them in one specification. State the order as L × W × H, and agree on rounding with the manufacturer instead of rounding inconsistently on your own. Small rounding differences add up across a box with an insert.
Set Interior Dimensions Before Planning the Outer Box
Define the usable interior first, and calculate the exterior afterward. Usable interior length, width, and height describe the space available for the product and insert. The overall outside measurements include the board, wrap, and construction, so they are always larger.
The product, protective clearance, insert walls, and insert thickness all shape the usable space. Rigid box walls reduce the available interior compared with the external footprint, so rigid box interior dimensions will be smaller than the outer size by the combined thickness of the walls. Work through these box structural measurements early, because changing the interior later forces every other number to change.
A supplier specification should include these measurements:
Interior length, width, and height
Exterior length, width, and height
Greyboard thickness for base, walls, and lid
Insert outer dimensions and cavity dimensions
Lid depth and flap dimensions
The unit and the rounding rule
Account for Greyboard Thickness and Wrapped Edges
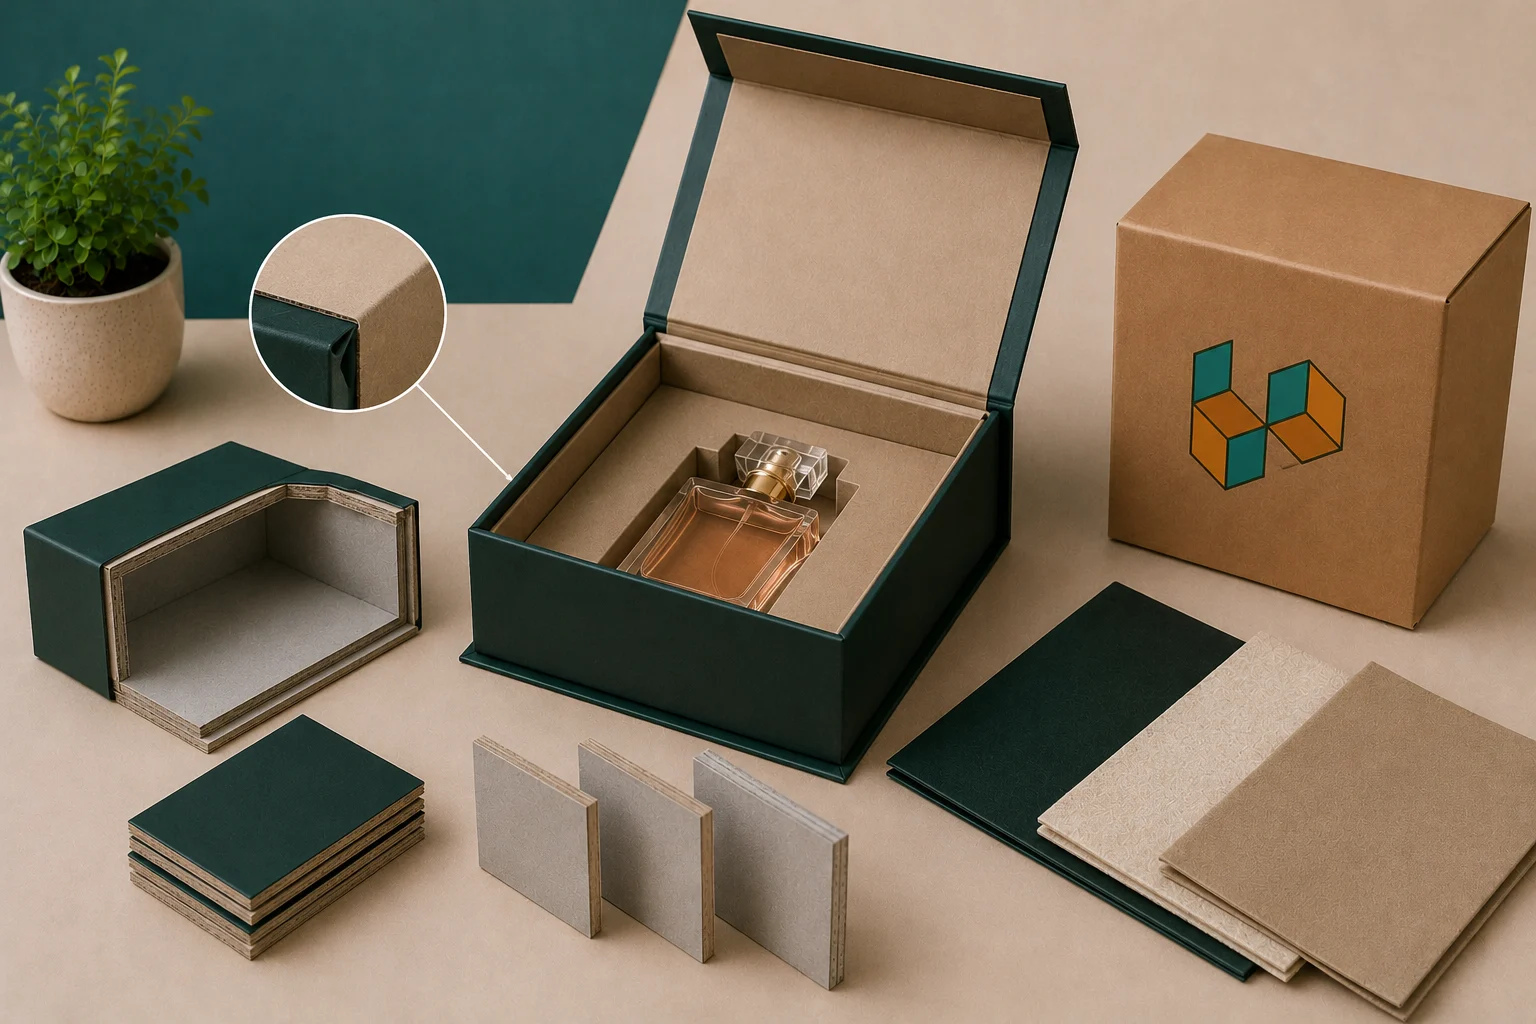
The internal measurements do not tell the whole story. A magnetic rigid box is built from a structural board core and a decorative wrap, so its finished exterior dimensions depend on the materials and construction method.
Choose Greyboard Thickness for the Box Structure
Greyboard is the dense board core that gives the base, walls, lid, and flap their rigidity. Common starting thicknesses are around 1.5 mm, 2 mm, and 2.5 to 3 mm, but these are supplier-dependent specifications, not universal requirements. Footprint, unsupported panel span, product weight, and magnet strength all influence the choice. Thicker board improves rigidity but adds weight and reduces usable interior space. No single thickness suits every box of a given size, so ask the supplier to justify the recommendation for your product.
Understand the Space Taken Up by the Outer Wrap
Printed paper, specialty paper, fabric, and inner lining all add to the finished dimensions. Wrapped edges and corner construction create material build-up that can affect lid fit. For that reason, manufacturers should calculate finished dimensions after accounting for the complete material stack.
Balance Strength With Usable Interior Space
A sturdy premium feel comes at the cost of interior room. Increasing board thickness without revisiting the internal measurements can create a poor fit. Confirm board thickness and finished internal dimensions on the same technical specification so both numbers are checked together. The factors a supplier should weigh include box size, product weight, lid span, magnet strength, and the wrap material.
Size the Magnetic Flap for a Clean, Secure Closure
A magnetic box must do more than fit the product. Its front flap also needs to meet the base correctly, cover the closure area, and let the magnets align when the box is shut.
Calculate the Front Flap's Required Coverage
Flap length and width relate to the front wall and the lid panel. The flap should reach the intended closing position without leaving a visible gap or overlapping awkwardly. Its finished dimensions must account for the board core and wrap material. A narrow flap can expose the front edge, while an oversized flap can interfere with opening and spoil the appearance. These magnetic flap measurements are among the most sensitive in the whole specification.
Position Magnets for Reliable Contact
The magnet locations in the flap and front wall must align when closed. Magnet size, number, spacing, and pull strength should match the flap width and lid weight. Magnets should be recessed and covered so they do not create visible bumps. Check the closure on a finished sample rather than relying on a flat drawing alone.
Allow for Wrap and Lining Around the Closure
Wrap paper and inner lining affect the meeting surfaces. The manufacturer should consider the complete wrapped thickness when calculating the closure gap, because uneven material build-up can prevent consistent magnet contact. To check a sample, close the lid several times and confirm that the flap sits flat, the edges line up, the magnets hold without help, and the lid does not spring open.
Plan Lid Depth, Hinge Space, and Opening Movement
Lid depth, base-wall height, hinge position, and opening angle all affect the overall design. The box's vertical height is not the same as the depth of the lid panel. A lid that is too shallow may not cover the intended area, while a very deep lid can interfere with opening or waste material. Treat box depth and height as separate measurements and record both.
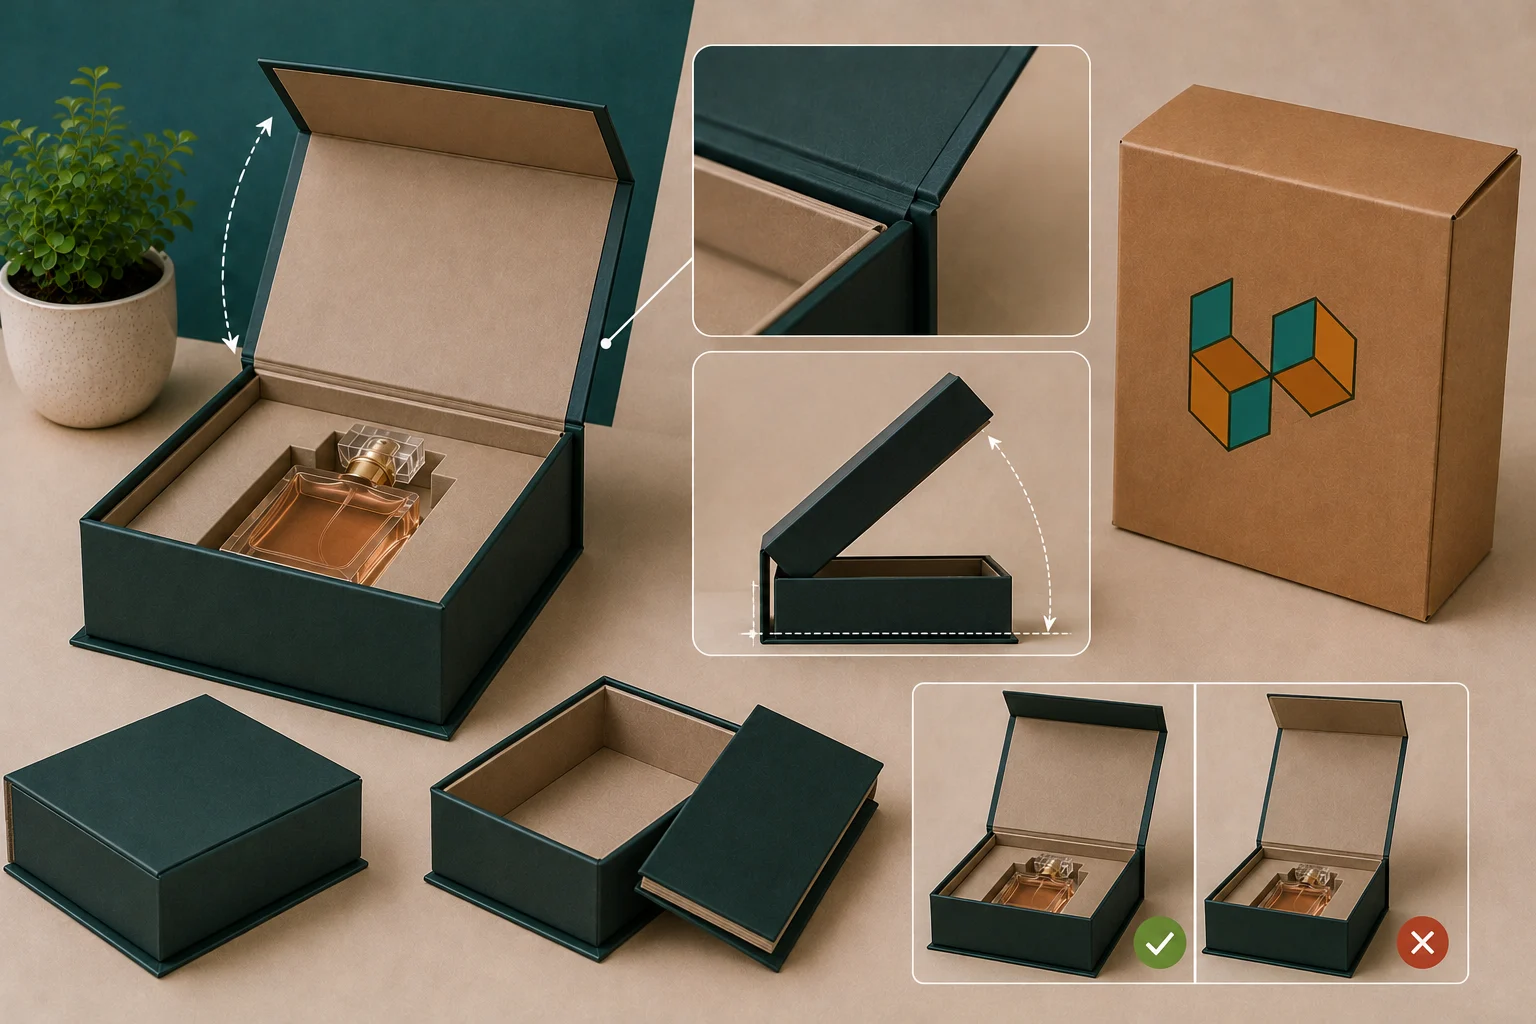
The hinge is the flexible connection between the lid and the back panel, and it needs clearance. Board thickness and wrap build-up change the hinge gap, so the gap should be calculated from the actual materials. Verify a closed sample and an open sample. Closed, check that the lid sits level and the gaps are even. Open, check that the lid reaches a comfortable angle, does not strain the hinge, and does not hit anything.
Design Inserts That Hold Products Without Wasted Space
The box interior must accommodate the insert as well as the product. A well-designed insert keeps items in position, supports a clean presentation, and prevents the packaging from feeling oversized.
Measure the Insert's Overall Footprint
The insert's total length, width, and height must fit inside the finished box. Count the thickness of the base, side walls, dividers, and any raised sections. The insert's outside dimensions and the product cavity dimensions are separate measurements, so keep them separate in the specification. Review a prototype insert before approving the final box interior.
Size Product Cavities for a Secure Fit
Cavity length, width, depth, and shape should follow the product's real profile. Leave enough room for easy placement and removal without letting the product shift. Foam, EVA, paperboard, molded pulp, and fabric-lined inserts each behave differently, and soft materials may compress, so test the cavity with the actual product.
Arrange Multiple Items Without Losing Balance
Dividers and separate cavities organize gift sets, cosmetics, fragrance products, and promotional kits. Keep spacing between products so bottles and accessories do not touch. Candle sets show how this works in practice, since a jar, a snuffer, and matches each need their own cavity, as many candle gift boxes demonstrate. The arrangement affects the box footprint and the visual balance when the lid opens.
Before production, confirm the insert's outer dimensions, cavity dimensions, insert thickness, and divider spacing. These magnetic box insert measurements decide whether the final interior works.
Match Box Proportions to a Premium Unboxing Experience
A box can be dimensionally correct and still look awkward. Proportions that do not suit the product leave too much empty space around it or make the lid look heavy. The relationship between length, width, height, lid coverage, and the visible space around the product shapes the first impression. Luxury gift box proportions tend to favor balanced margins and a centered insert.

Low-profile boxes suit flat gifts such as scarves or jewelry cards. Taller formats suit bottles, candles, and layered gift sets. Consistent spacing around the product looks deliberate, while uneven margins look careless. The opening experience matters as well, since the product can be revealed at once or in layers. Luxury magnetic box dimensions should serve that moment as well as the fit. Keep in mind proportion, centered insert, consistent margins, lid coverage, and whether the product should be revealed in one step or several.
Choose Materials and Structures for the Box Size
The same interior dimensions can behave differently depending on construction and material choices. Each structure changes the specification.
Compare Book-Style and Double-Door Designs
The book-style magnetic box has a hinged cover that opens from one side. It is the most common format for gifts, cosmetics, and electronics, and book-style rigid boxes are a standard reference for it. Double-door designs use two opposing flaps that meet at the center, so the two panels need matching widths and clean alignment. Select the structure before you finalize flap and lid measurements.
Consider Collapsible Magnetic Rigid Boxes
Collapsible constructions reduce shipping and storage volume before assembly. Folding panels, corner attachments, and assembly clearances add complexity. Ask the manufacturer for a sample to confirm the assembled box keeps the intended dimensions and closure quality.
Match the Outer Wrap and Finish to the Structure
Finish options include printed paper, textured paper, fabric, and specialty wraps. Foil stamping, embossing, debossing, and soft-touch finishes change the visual presentation. Consider them during sampling because material build-up and surface treatment can affect fit at edges and closure points.
Table: Magnetic Box Construction Comparison
Construction type | Opening style | Main dimensional consideration | Suitable applications |
Book-style | One hinged cover | Hinge gap and front flap coverage | Cosmetics, gifts, electronics |
Double-door | Two panels meet at the center | Matching flap widths and center alignment | Premium gift sets, presentation kits |
Collapsible magnetic | Panels fold for storage and assemble into a box | Folding clearances and assembled shape | E-commerce kits, promotional packaging |
Check a Custom Box Sample Before Full Production
A digital drawing or measurement sheet is not enough to confirm that a box will work in practice. Before approving a production run of magnetic rigid boxes, inspect a physical sample for dimensional accuracy, insert fit, flap alignment, lid movement, magnet contact, corner finishing, and visible gaps. Test the actual product inside the sample, including any sleeve, protective wrap, or accessories that ship with it. Use the same measurement convention and units in the approved sample and the final specification, so custom magnetic box measurements stay consistent from sample to production.
Table: Custom Magnetic Box Sample Inspection
Inspection point | What to check | Why it matters |
Interior dimensions | Product and insert fit without force | Confirms usable space |
Exterior dimensions | Finished length, width, and height | Confirms the final footprint |
Flap alignment | Flap meets the front wall evenly | Prevents visible gaps |
Magnet contact | Magnets meet and hold consistently | Supports reliable closure |
Hinge movement | Lid opens and closes without strain | Reduces wear at the hinge |
Insert fit | Insert sits flat and holds contents | Prevents movement |
Surface and corners | Wrap is smooth and edges are neat | Maintains premium presentation |
Final Thoughts on Getting Magnetic Box Dimensions Right
Accurate magnetic closure box dimensions depend on product measurements, interior clearance, material thickness, insert design, and closure geometry. Boxy Pack helps businesses develop custom packaging specifications that account for these factors. Each of these affects the others, which is why a change to board thickness or an insert should always lead to a review of the interior and exterior numbers. Example size charts are useful starting points, but a custom specification should come from your actual product and the finished construction.
Confirm inside and outside measurements, board thickness, flap coverage, and insert fit with your packaging supplier before production. A short review at the sample stage costs far less than correcting a full run that does not fit.
When you are ready, prepare your product measurements and request a custom magnetic box sample or specification review from Boxy Pack. Having the numbers ready makes the process quicker and leads to a better fit.
Frequently Asked Questions About Magnetic Box Dimensions
Magnetic closure boxes can be made in many shapes and sizes to suit different products and presentation needs. The right dimensions depend on the contents, materials, insert, and magnetic closure design. These FAQs cover additional sizing and specification details to help with planning custom packaging.
Can magnetic closure boxes be made in nonstandard shapes?
Yes. Square, tall, shallow, and other custom proportions are possible. Unusual shapes may need a custom dieline and extra sampling to confirm the closure works.
Should a magnetic gift box have a separate tolerance for handmade products?
It is wise to allow for it. Handmade items vary slightly in size, so a little extra clearance in the cavity helps every unit fit. Measure several pieces and base the specification on the largest.
Do magnetic rigid boxes need different dimensions for shipping?
The box itself does not change, but shipping often calls for an outer carton with extra space for protection. Check the carton's size against carrier limits and make sure the rigid box has room for padding.
Can the same magnetic box design accommodate several product variations?
It can, if the variations are close in size. Different inserts can adapt one box to several items. Large differences in height or width usually need separate box sizes.
How can a packaging supplier confirm dimensional accuracy during production?
Suppliers commonly compare production units to the approved sample and measure interior and exterior dimensions against the specification. Ask what tolerance they work to and how they check it.
Does a heavier lid require a different magnetic closure specification?
Often, yes. A heavier or wider lid may need stronger or additional magnets and thicker board to keep a flat, secure closure. Confirm this on a sample.
What information should be included in a magnetic box dieline?
A dieline should show panel dimensions, fold lines, flap and hinge positions, magnet locations, board thickness, wrap allowances, and the unit of measurement.
Ready to Get Started?
Discover our custom packaging solutions and bring your brand to life with premium boxes.